Written by Tanmay M, Student at Indian Institute of Technology Mandi
Zephyr Installation and running on ESP32
In this blog, we are going to see how to install Zephyr RTOS on a Ubuntu OS(20.04 LTS) and run it on an esp32 board. The one I presently use is the ‘Espressif esp32-wroom=32’ board. We will discuss the board and hardware aspect later. For now, let’s focus on installation of Zephyr. Here, I will be going through the steps in the order which I went through along with discussing different issues faced. Since I recently had to reinstall my Ubuntu, I’ll also talk through beginner steps. Let’s get started!
Updating OS
This is done, along with existing reasons, to make Ubuntu optimally configured with the Zephyr and stay out of dependency errors.

Installing required dependencies
Installing the dependencies required before moving on with Zephyr installation
Now, verify the versions of the dependencies so as not to run into errors:

The current minimum required version for the main dependencies are:
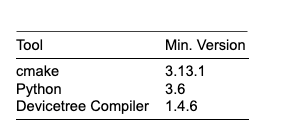
If the dependencies do not meet the minimum criteria, refer the official documentation here: https://docs.zephyrproject.org/latest/getting_started/installation_linux.html#installation-linux to get the required version.
Installing West
Now, we need to install west. Run the following terminal commands to install:

Point worth noting here is that I described west installation separately instead of doing it along with others because west tool manages the entire life-cycle of a Zephyr-based project. This will become clearer and self explanatory as we go on through installation and running of Zephyr.
Now, making sure that ~/.local/bin is on our environment variable “PATH”, run:

Note: Always check the apostrophe are paired properly, since mismatching or a different font (like ‘ instead of ‘ ) will throw errors.
Starting up with Zephyr
Now run the following commands to get zephyr source code:

This may take some time.
Now we will export a Zephyr CMake package that causes CMake to automatically load some boilerplate code:
![]()
Now we will install additional zephyr python requirements through pip3:
![]()
Installing Zephyr’s ToolChain
We will now install zephyr’s SDK that provides additional useful tools

Now we will run the installer:
Now we will make the downloaded file into an executable one; use the command:
![]()
And then run the file:
![]()
It will install Zephyr SDK toolchain under the name “zephyr-sdk-0.12.4” file in the home directory
It is recommended to install the SDK tool in the home directory or the other recommended directories mentioned on the official sites. Interested readers can check out why here: https://docs.zephyrproject.org/latest/getting_started/installation_linux.html#zephyr-sdk
Now since we are using esp32, we need to tell Zephyr where to find the toolchain for ESP32’s Xtensa architecture.
Run the following commands in the terminal:

Alternatively, we can add these lines to our bashrc so that we can use it anytime(remember to change it when you will use a different board). Just edit ~/.bashrc using your editor and save the changes.
Now we will proceed with the installation

And we are done with zephyr installation! Easy wasn’t it 😉
Now let us build a sample hello world application that is already present in your zephyrproject directory. Run the following commands:

In the first line we change the directory to the app’s location.
In the second line, we use west to build the app. The “-p auto” option automatically cleans byprod-ucts from a previous build if necessary, which is useful if you try building another sample. “-b esp32” indicates that we are building the app specifically for the esp32 board.
Note: If the previous build fails with a message indicating missing Python packages, your OS likely uses python2.x by default. Change it and build the app again.
We will need a serial program utility to see the logs. You can use any that you prefer. Here I will use minicom.
Install minicom:
![]()
To open minicom’s serial settings,use the command:
![]()
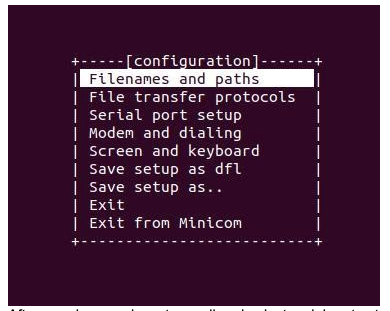
After opening, use keys to scroll and select serial port setup
Set the options as below:
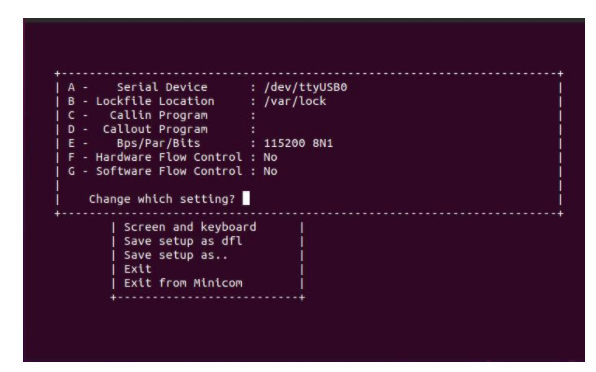
By default, the port is tty/USB0. If you are not sure, try using it further, if you see that it is occupied then we can change it again to a different port.
Flashing the binary of the App:
Use the command to flash the app to esp32 board. Make sure that the USB connection to board and system are properly connected or it can throw “Device not connected” errors.
![]()
One problem that I faced here after running above command was that it was showing me:
![]()
After experimenting for a while trying to solve this error, I found that the current user did not have access to the ttyUSB0 directory. Follow the below steps to solve this error:
First see if the system recognizes the esp32 board by using:
![]()
or
![]()
If it is not recognized try checking for loose connections or use another port.
Now check if the current user has access to the tty, dialout groups, use:

If your current user does not contain tty and dialout in the list, give access to the user by:
![]()
Replacing GROUP with “tty”, “dialout” one at a time and username with the user’s name that you want to give access to. Make sure to logout and login each time after using the above command and check again by using groups command if they have been added. Depending on your system you may have to login and logout multiple times or restart your system.
Now you should be able to flash the binary without any problem. If there is any connectivity problem, try reducing the baudrate to a lower value than 115200 in the minicom. Best practice is halving the value each time and checking the usability. If the board is refusing to connect, try holding down the Boot button on the board till the connection is established.
Now, if everything went right, you will be able to see the Hello world message on the screen.
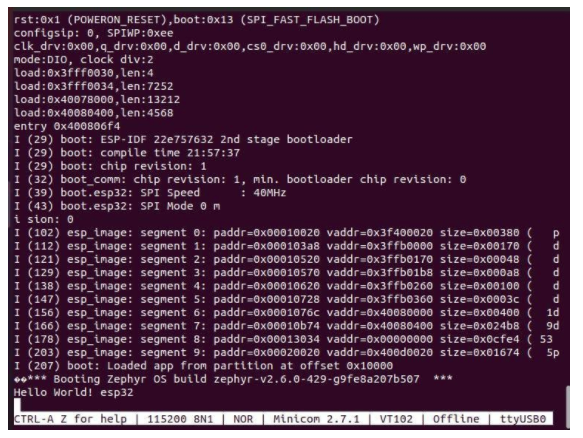
Congratulations! We have successfully set up zephyr and tested it with an esp32 board.
Beyond Hello World
You can start playing around with other examples present in the samples directory. In the next post, we will go through different module specific examples like using WiFi, Bluetooth modules of esp32.
References:
https://docs.zephyrproject.org/latest/boards/xtensa/esp32/doc/index.html