Written by Abhijit Bose, an Embedded, Analog and Hardware Engineer and new member of the Zephyr community

This blog originally ran on Abhijit’s personal website. For more content like this, click here.
The Zephyr OS is based on a small-footprint kernel designed for use on resource-constrained and embedded systems: from simple embedded environmental sensors and LED wearables to sophisticated embedded controllers, smart watches, and IoT wireless applications.
From Zephyr Project Documentation
We would look at initializing the environment and installing necessary dependencies. This is Part 1 in the series of post on Zephyr OS. In Part 2 we would look at an Example of Blinky program running on STM32F3DISCOVERY Board . In Part 3 we look at how to get started with Application Development on Zephyr OS using our custom blinky projects on STM32F3 Discovery Board .
Most of the help about this project targets Ubuntu.
You know how much I like Manjaro (Arch Linux).
Hence, my effort towards documenting my journey in setting up Zephyr OS Development Environment in Manjaro (Arch Linux).
1. Getting the Dependencies Right
First step is making sure that you have the correct pieces of software installed.
Here is big set of dependencies:
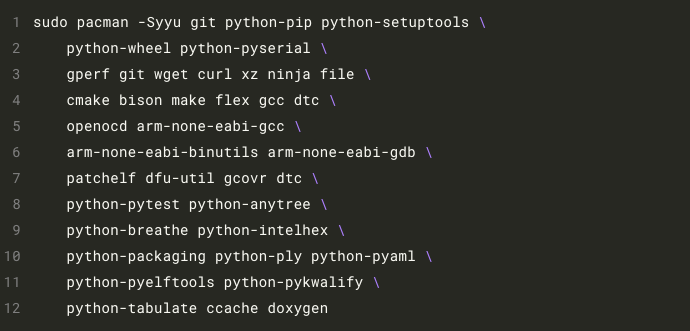
This would install the first set of packages. Its needed to build the support tools for Zephyr OS.
Additionally we also install arm-none-eabi-* and openocd. This would later help us with the in working with ARM boards.
There are some Dependencies that need to use AUR .
2. Setting Up west (Zephyr’s meta-tool)
The Zephyr project includes a swiss-army knife command line tool named west1. West is developed in its own repository. Like git and docker, the top-level west command takes some common options, a sub-command to run, and then options and arguments for that sub-command:
From Zephyr Project Documentation(West)
We would be using the Repository:
https://aur.archlinux.org/packages/python-west/
GIT URI: https://aur.archlinux.org/python-west.git
I have already explained the installation procedure in the past. For the benefit of this article here are the exact steps.
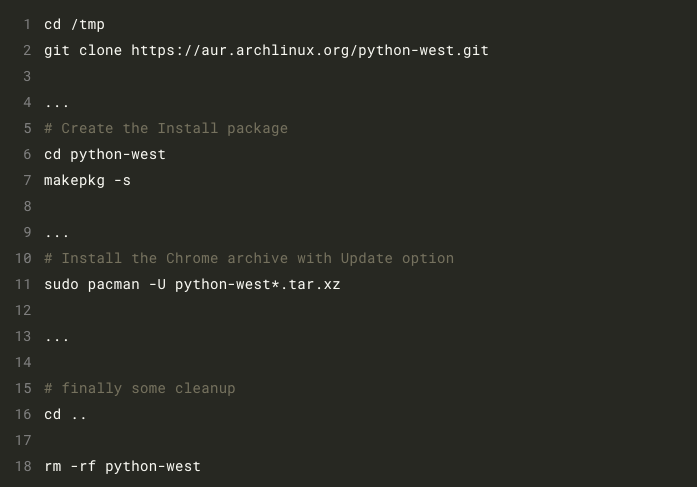
You can also use the Add and Remove Software application to install – If AUR support is enabled. 
3. Create a Workspace
In order to begin development, we need to create a designated Workspace.
Here are some reasons to do this:
- Central place to keep all Zephyr OS development files
- Quicker Updates and revision + development dependencies download using
west - Use as
Eclipse CDT Workspacedirectory. We would see the benefits later, when we start development using Eclipse IDE.
We would create the directory in the user home folder.
mkdir $HOME/Workspace
4. Download the Configuration
The west tool as discussed earlier has a separate repository. Hence before it can work in Zephyr OS it needs the initial configuration to be loaded.
west init ${HOME}/Workspace
Note: This command uses Internet and needs good bandwidth.
4.a [Fix] (optional) Broken Download of Configuration
In case this command fails or hangs you need to remove the context and try again:
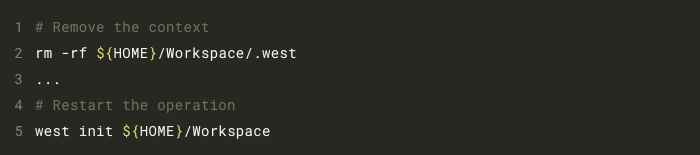
Once this is done our Workspace has the west configuration and releases information.
5. Download all Zephyr OS packages
The Zephyr kernel supports multiple architectures, including ARM Cortex-M, Intel x86, ARC, NIOS II, Tensilica Xtensa and RISC-V 32. The full list of supported boards can be found here .
From Zephyr Project Documentation(West)
This is large one. Needs lot’s of time and Good Internet Bandwidth
It would download nearly 2.6GByte of data.
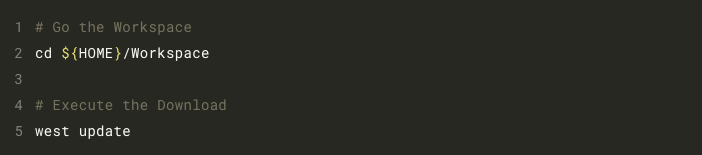
Note: In case this command fails don’t worry. You can just issue the command again. It would start download where it stopped.
5.a [Fix] (optional) Update the existing Workspace
In order to update the existing workspace issue the following commands: This is only needed if you want to freshen your Zephyr OS packages. Or the update is no longer working.

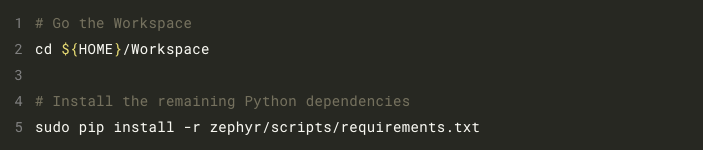
6. Additional Python dependencies after Zephyr OS package Download
Even after downloading the Packages in the earlier step, there are still some minor things left.
4. Create the Environment setup file
In order to use cmake we need to set some Environment variables. We would do that using the Linux source command.
Lets create the Environment file:
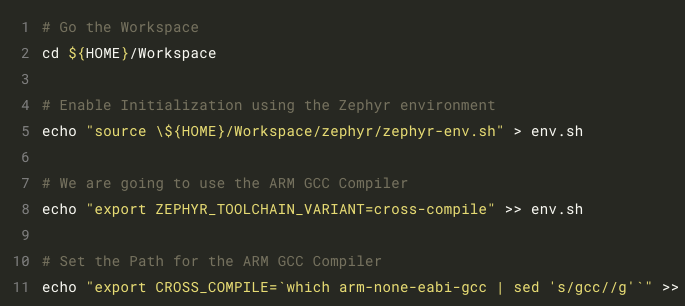
Note: In the last command we specifically remove the gcc part from the path. This is a necessity specific to Zephyr OS cmake scripts. Have a look at it by running in the terminal if you are unsure whats happening there.
5. Setting up openocd Rules for using all types of debuggers
In Linux we need to specifically need to allow the use of specific USB VID:PID. To this we would download a default script from openocd repository.
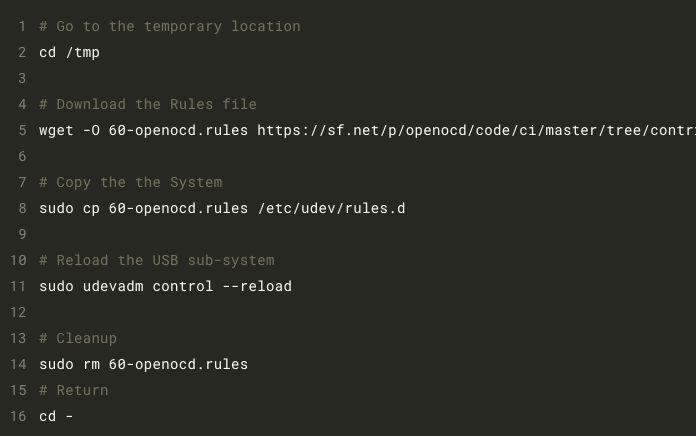
It’s best if the PC is rebooted after these. Though the reload of USB sub-system should also do the job. Make sure reconnect the USB connection of the development board after this.
All Done
Yes we are done with the setup of our working environment.
This would enable us to development projects for Zephyr OS.
Lets look at an Example in my next article.
References
- Zephyr Documentation https://docs.zephyrproject.org/latest/
- Some un-related but helpful Video https://www.youtube.com/watch?v=HulT3RVHoKk
- AUR Package that helped me to find out some of the dependencies https://aur.archlinux.org/packages/zephyr-sdk/