Written by Vojislav Milivojević, an Embedded software lead at IRNAS, and originally ran on the Golioth blog. For more content like this click here.

As embedded software engineers we usually have some associated hardware sitting next to our computer that is used for developing and testing our code. In most cases, this piece of hardware is connected to our computer with a so-called “programmer”, an additional tool that allows us to access processors and controllers for which we are developing code. Here we will explore the relationship between devices we are developing and a computer, but it won’t be a standard one, it will be a long-distance relationship.
I lead the firmware development at IRNAS, where we push the limits of efficient solution development on IoT devices, but since I live in a different country than the rest of my team, there are usually a lot of packages with PCBs going back and forth. While that is not a big problem, there are times when some pieces just cannot get to me quickly enough to meet customer demands. There have also been times where a specific LTE network is not available in my region. Overcoming this issue is usually done with remote desktop solutions that are not so efficient, or with some special equipment that in a nutshell is again a computer with some additional hardware. Since I needed such a solution, and none of the existing ones were able to give me a nice out-of-the-box experience, I decided to design and document a process that works for me and the complete IRNAS engineering team.
Using Segger tools
There are many solutions, commercial and open-source, that provide embedded development tools such as programmers, IDEs, logging features, etc. One of these is solutions providers is Segger, and their hardware sometimes comes as part of development boards which is really nice. At IRNAS we tend to favor using Segger J-Link tools as our ‘go-to’ solution for target flashing and debugging while building connected products. Besides that, they have a range of very useful features for embedded developers, and one of these tools is Segger Tunnel mode. This is a remote server that allows the users to connect to a J-Link programmer (and thus its connected target device) over the internet. This means a device located anywhere in the world can be debugged or brought up.
Mixing with Zephyr (west tool)
Since most of the projects that I am working on are using Zephyr RTOS, this means that the west tool is used for flashing, debugging, and many other things. West is a meta-tool that abstracts software for all different programmers and gives us the ability to easily flash for multiple targets while not needing to remember long command lines. West does support Segger J-Link for specific targets and it can be selected as one of the offered runners. The good thing about west is that it will let us pass commands to the selected runner which gives us the ability to fully utilize all the functions of the selected J-Link software.
Set up the hardware and software
In December of 2020 there was great news from Segger that the complete J-Link software is now available to run for Linux on ARM architecture, which meant that Raspberry Pi is now supported as a host machine! The idea was to connect a J-Link programmer to Raspberry Pi, add in some software, and we have ourselves a remote programming jig.
Components needed for this demo:
- Raspberry Pi
- J-Link programmer
- Board with the target MCU
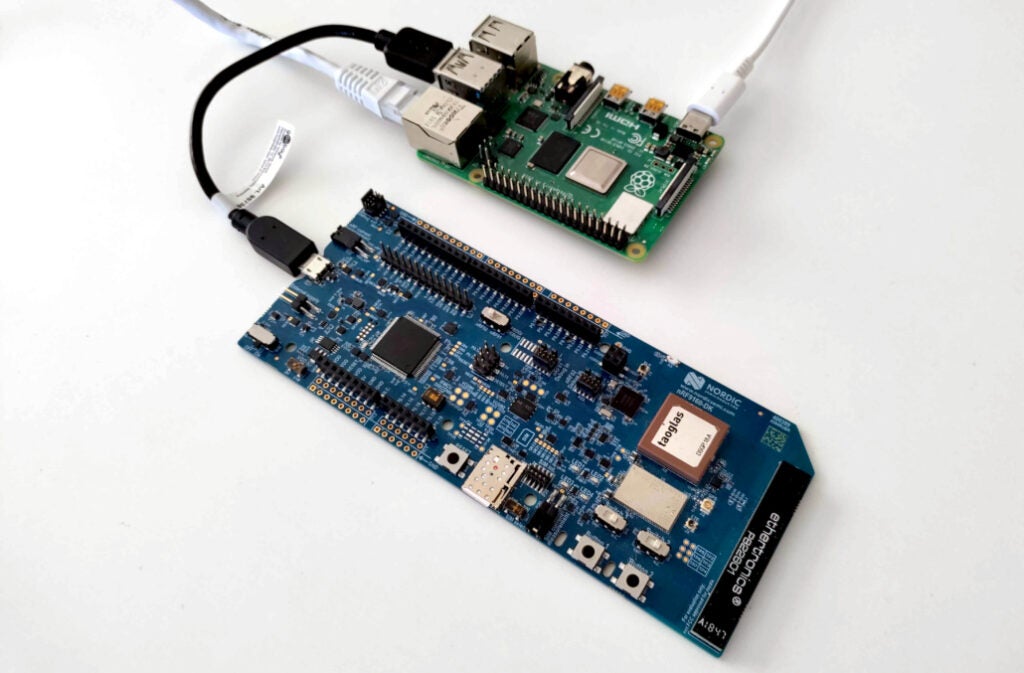
For the purposes of this demo, we will be using the Nordic Semiconductor nRF9160DK development kit since it already contains both a J-Link and the target MCU hardware. The board connects via USB to the Raspberry Pi which connects to power and Ethernet (WiFi is also an option).
Now J-Link software needs to be installed on Raspberry Pi so it can work as a remote J-Link Server. In the Raspberry Pi user home directory, download and un-tar the Segger utilities for the Raspberry Pi (choose the Linux ARM 32-bit TGZ archive). Then configure the udev rules as per the README.txt file in the JLink_Linux_Vxxx_arm directory.
$ wget --post-data 'accept_license_agreement=accepted&non_emb_ctr=confirmed&submit=Download+software' https://www.segger.com/downloads/jlink/JLink_Linux_arm.tgz
$ tar xvf JLink_Linux_arm.tgz
$ cd JLink_Linux_V646g_arm/
$ cat README.txt
$ sudo cp 99-jlink.rules /etc/udev/rules.d/
$ sudo reboot
Next, it is time to start the remote server. On a GUI-based system, this can be done with a small application from Segger, but the good thing is that the CLI tool is also provided. I recommend checking all available options for this tool by starting it and then typing ? at the prompt.
pi@raspberrypi:~ $ JLinkRemoteServer
SEGGER J-Link Remote Server V7.22b
Compiled Jun 17 2021 17:32:35

'q' to quit '?' for help

Connected to J-Link with S/N 960012010

Waiting for client connections...
?Command line options:
? - Prints the list of available command line options
-Port - Specifies listening port of J-Link Remote Server
-UseTunnel - Specifies if tunneled connection shall be used
-SelectEmuBySN - Specifies to connect to a J-Link with a specific S/N
-TunnelServer - Specify a tunnel server to connect to (default: jlink.segger.com:19020)
-TunnelBySN - Specifies to identify at tunnel server via J-Link S/N
-TunnelByName - Specifies to identify at tunnel server via custom name
-TunnelPW - Specifies to protect the connection with a password
-TunnelEncrypt - Specifies to encrypt any transferred data of a tunneled connection
-TunnelPort - Specifies to connect to a tunnel server listening on a specific port
-select - <USB/IP>[=<SN/Hostname>] Specify how to connect to J-Link
Before entering the command we need to think of a name for our tunnel and a password. For me, this will be tunnel name: remote_nrf91 and password: 19frn. Then start the remote server with the command:
JLinkRemoteServer -UseTunnel -TunnelByName remote_nrf91 -TunnelPW 19frn
Demo time
To test this remote flashing we will build a demo application on our host computer. nRF Connect SDK (NCS) that is based on ZephyrRTOS contains some sample applications and we will use shell_module, which enables us to use shell commands over UART with nRF9160. The selected application is located in the ncs/zephyr/samples/subsys/shell/shell_module folder of NCS. To build it for nRF9160DK we will use the command:
west build -b nrf9160dk_nrf9160_ns -p
After that let’s flash the board that is connected to our remote Raspberry Pi. The default runner for flashing the nRF9160DK is nrfjprog, but instead of that, we want to use the J-Link supported runner. Since the west tool does not natively support remote flashing, parameters will be sent directly to the J-Link software using the --tool-opt flag.
west flash -r jlink --tool-opt="ip tunnel:remote_nrf91:19frn"
This will flash our target MCU that is connected to J-Link and Raspberry Pi. To validate the result, open the serial terminal on Raspberry Pi and see if shell commands are working.
minicom -D /dev/ttyACM1 -b 115200
Summary
While Segger provides very interesting tools for embedded developers, there is still some work that needs to be done so they are properly integrated into our development workflow. Remote flashing is just one part of all capabilities, so this can be a starting point for a great remote development setup!