Written by Mike Szczys, Zephyr Ambassador and Developer Relations Engineer at Golioth

This article originally ran on the Golioth website. For more content like this, visit https://blog.golioth.io/.
I feel like I begin every Zephyr article talking about how this RTOS’s greatest strength and greatest weakness is the extent of its hardware abstraction. Such is the case with the Zephyr Pin Control (pinctrl) system that became the default approach for pin configuration and multiplexing back in June. This development made great strides in standardizing how to work with pinmux configuration across many vendors, and unified the process of reassigning pin functions at runtime. These gains are at the expense of needing to understand the new syntax. Let’s dig in!
What is pinctrl?
The pinctrl (Pin Control) system is a standardized way of assigning peripheral functions to pins, a concept adopted from Linux. Pin Control lets us define which pins will be used for special functions (SPI/i2c/UART) and how those pins will be configured (pull up/down resistors, slew rate).
In the past we would have remapped an i2c pin inside the i2c node itself using a syntax like sda-pin = <33>;. With pinctrl we don’t necessarily touch the i2c node–it is instead given the address of a pinctrl nodelabel. The pinctrl-state nodes are where actual pins are specified, using a syntax that might look like &i2c1_sda_gpio33. (The exact format of pin addressing varies by vendor. We’ll discuss how to look up that info.)
So what do we gain from this change? One example is reconfiguring a chip for low-power before entering sleep mode. pinctrl automatically looks for two states: default and sleep. When changing from the default state to the sleep state, pinctrl will automatically reconfigure all of your power-sucking pins for low-power, and set them back up again upon wake.
Example: use pinctrl to change i2c pins
A great exercise when learning pinctrl is to reassign pin locations on an existing board. I’ve been working with the ESP32s2 and there is a “saola” board definition in Zephyr. If we study the pinctrl file for that board we find that i2c1 normally maps GPIO3 and GPIO4:
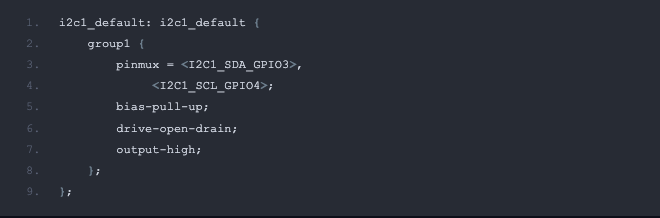
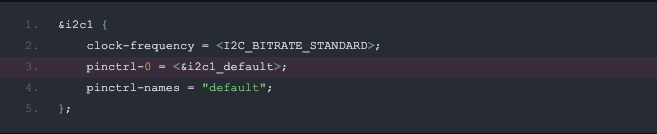
This pinctrl node uses a nodelabel of i2c1_default which is associated with the i2c1 peripheral in the board’s .dts file:
Let’s say we wanted to change these pins to GPIO33 and GPIO34. We could make our own pinctrl node with a different node label and change which nodelabel is used for i2c1. However, the easiest thing is to simply change the pin assignments in the default node, which allows us to inherit all the other settings from the board definition. This is done by adding an esp32s2_saola.overlay in the boards directory of our application. Remember, an “overlay” allows you to tell the build system that the local changes in your build directory are more important than the default settings in Zephyr, and to adopt the local changes.
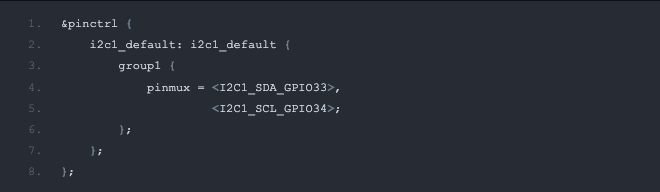
Whenever remapping pins, it’s important to check that the new pin assignments are available. In our case, GPIO33 is available, but GPIO34 is mapped to the pinctrl default for SPI3. To avoid a conflict, that pin should be remapped, or if the SPI3 peripheral is not used the SPI3 node can be deactivated or deleted.
Read the bindings pages for vendor-specific pinctrl info
In the example above we used I2C1_SDA_GPIO33 to remap a pin. This syntax is unique to Espressif chips, and will be different for Nordic, Microchip, NXP, Infineon, or any other vendor chips. The same assignment for a Nordic chip would be something like NRF_PSEL(TWIM_SDA, 0, 30). We admit, this is annoying. But Zephyr is an ecosystem, in addition to being an RTOS. Each vendor does the hard work of making their specific chips work with the rest of the code, an this is the cost of them being in control.
Vendors have documented their pinctrl implementation in their device bindings pages. Head over to the Zephyr bindings index and look for the pinctrl entry for your vendor. Espressif’s entry points to a set of macro definitions that lay out every possible function for each pin. Nordic’s entry indicates that rather than define each pin, we can use a macro to call out the nRF pin function along with the port and pin assignments.
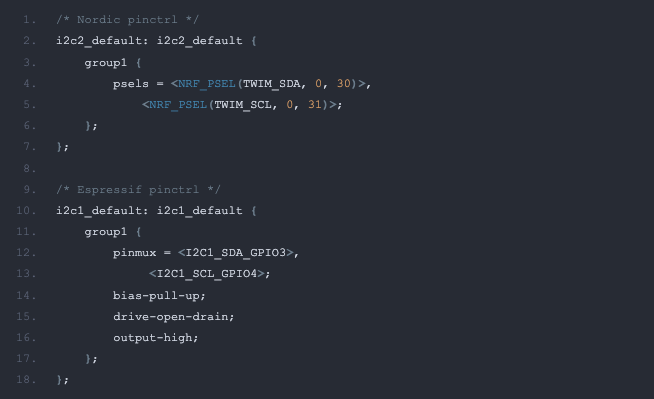
The syntax itself is different from one vendor to another. The snippets above demonstrate that, in addition to pin assignment differences, Nordic uses psels to set the pins while Espressif uses tmux. Always check the bindings index pages, and when in doubt, look to the board definition files as examples.
Dynamic control
A full guide on dynamic control is out of scope for this post. To touch on the topic, choosing to use dynamic pinctrl makes it possible to update pin function at runtime by moving the pin configuration from ROM to RAM. The pinctrl_update_states() function is then used to assign a new state, executing the necessary configuration changes in the process.
Check the pinctrl test app for an example of dynamic control.
The good and the bad of pinctrl
I generally think the move to pinctrl is a good one. Sure, there are syntax differences between vendors, but that was true before the change as well. Now you can expect to find all important pin assignments inside of the pinctrl state nodes, which is a bit easier to reference, and makes it easier to see not just the pin numbers, but the configuration (slew rate, pull up/down, etc.).
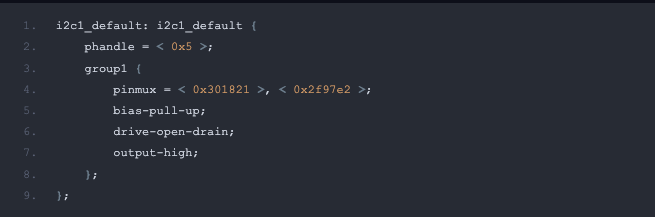
One change that I have not been as happy about is in troubleshooting Devicetree issues. After building a project, it’s often useful to inspect the build/zephyr/zephyr.dts file that is generated. I’ve included an example above, can you tell me if my pins have been properly assigned?
The more you use pinctrl, the more useful it becomes. I’m sure you’ve noticed that some nodes include groupN style groupings. This associates multiple pins with the same needs (ie: for SPI, these three pins are outputs, but this other pins is an input) which is a welcomed shorthand that saves us from assigning pin flags over and over again. Take some time to learn the new system and start taking advantage of its perks!
If you have questions or would like to discuss this in more detail, join the Zephyr community on Discord.