Written by Carlos Eduardo de Paula, Senior Cloud Architect at Red Hat and RISC-V Ambassador
In this article, we will create a complete environment for developing and simulating embedded applications with no need for external hardware. (The files for the complete project can be cloned from this GitHub
repository: https://github.com/carlosedp/PlatformIO-Renode-Demos.)
We will install and configure Visual Studio Code, PlatformIO and Renode, all open-source tools and then create a simple project using Zephyr RTOS to be run on a simulated RISC-V HiFive1 board showing how the integration of these projects can bring benefits for the ecosystem and your workflow.
Embedded system developers know that usually the it is required not only the developer workstation but also the target devices, hardware to flash, configure and debug these devices like JTAG debuggers or dongles and cables. Lots of cables. Having a self-contained environment can help and speed-up your development and testing process.
At the end, you will have a setup similar to the picture below, making the toolchain management less painful allowing you to focus on the application itself.
Components
PlatformIO
PlatformIO is a new generation toolset for embedded development. It leverages the integration with IDEs to provide Intelligent code completion and Smart code linter with Built-in Terminal and Serial Port Monitor.
Its cross-platform build system without external dependencies to the OS provides 700+ embedded boards, 30+ development platforms, 20+ frameworks.
It contains thousands of Popular Libraries to be used on projects that are indexed into single platform with advanced search by keywords with project dependency management and Semantic Versioning requirements.
Platforms can be embedded and desktop targets composed of pre-built toolchains, debuggers, uploaders and frameworks which work under popular systems like Atmel AVR, ST STM32, SiFive, ESP and more. These platforms can even have sub-platforms that are the toolchains used for this platform for example on Atmel, you can develop using Arduino or Simba, on SiFive you can use their FreedomSDK or Zephyr, on STM32 you can use Arduino, Zephyr, Mbed and many more.
Renode

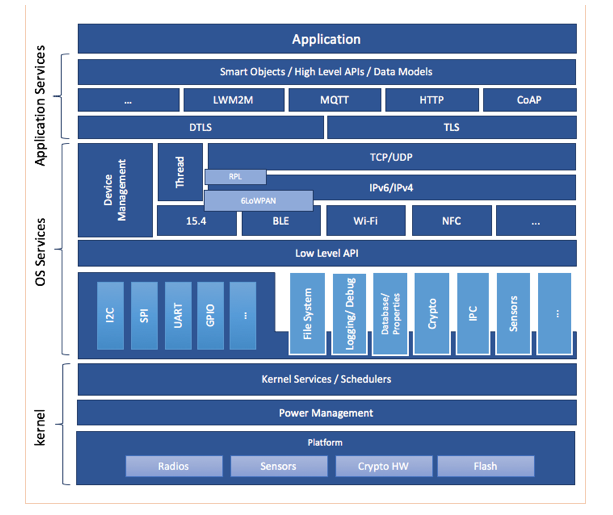
Renode is a development framework which accelerates IoT and embedded systems development by letting you simulate physical hardware systems — including both the CPU, peripherals, sensors, environment and wired or wireless medium between nodes.
It lets you run, debug and test unmodified embedded software on your PC — from bare System-on-Chips, through complete devices to multi-node systems. Applications built and run on Renode requires no changes to be run on the physical device.
This allows development for embedded systems without having access to the physical devices at all times. Currently, it supports the simulation of platforms from SiFive, STMicroelectronics, Microchip, Silabs and others. These platforms have STM32, RISC-V, Tegra and many other cores which can be composed as simple or complex multi-node configurations.
You can check the list of supported boards, or in more detail the available CPU’s and configuration scripts.
Zephyr RTOS
The Zephyr™ Project strives to deliver the best-in-class RTOS (Real-Time Operating System) for connected resource-constrained devices, built be secure and safe.
Zephyr is a open, collaborative environment to deliver an operating system that’s open source, applicable in a wide diversity of use cases, and currently supports more than 170 hardware devices.
Zephyr has a small-foorprint Kernel focusing on embedded devices compatible with x86, ARM, RISC-V, Xtensa and others but nothing stops you from developing an application able to be run on your computer console.
The built-in library provides drivers and stacks for multiple protocols and services. Explore the documentation for all the available features.
SiFive HiFive1 Board
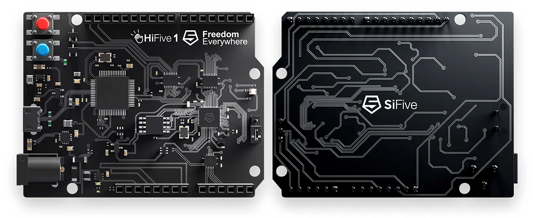
The HiFive1 is a low-cost, Arduino-compatible development board featuring the Freedom E310 SOC. It’s the best way to start prototyping and developing your RISC‑V applications.
The E310 SOC contains a SiFive E31 RISC-V core following the RV32IMAC instruction set providing Integer, Multiplication, Atomic and Compressed instructions.
We will simulate the complete functionality of the HiFive1 board on Renode running an application and interacting with its serial console.
Remember, no hardware is required except your own computer! 🙂
Setting up your environment
The first step is setting the development environment. We will first install the pre-requisites and then we will see how PlatformIO will handle the installation of the development libraries for us.
Installing Visual Studio Code
Visual Studio Code is a free and Open-Source IDE platform created by Microsoft and available for most operating systems (Linux, Mac, Windows).
Head to https://code.visualstudio.com/, download the installer package and follow the process to install on your system.
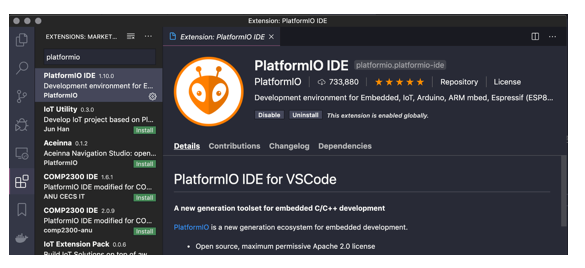
Install PlatformIO IDE on VSCode
After installing VSCode, install the PlatformIO IDE. It’s the platform that manages the embedded systems toolchains, build processes, code upload to the boards, debugging and much more.
It’s presented as a plugin for multiple editors including VSCode. You can check all it’s integrations on the documentation.
To install on VSCode, click the “Extensions” icon on the left menu bar and search for “platformio”. Click it’s name and “Install”. It might ask for VSCode restart.
When you first open VSCode, PlatformIO will present it’s “Home Screen” where you can quickly view the documentation about supported platforms, boards, the library browser and create/browse projects.

Installing Renode
Head to Renode website and download the package for your system and install accordingly. You can also check their release notes on GitHub for newly added support and features. Installing is a matter of dropping the app on the Mac, installing a MSI on Windows or a rpm/deb on Linux.
To make things easier on Mac, I created a symbolic link in the PATH to launch Renode easily:
sudo ln -sf /Applications/Renode.app/Contents/MacOS/macos_run.command /usr/local/bin/renode
This way I can just launch it by typing renode and pass command line arguments if needed. Also makes things easier on PlatformIO integration. I recommend creating this link on your platform of choice too.
Creating a new project
Now lets create a new project. For this article we will create a simple application using Zephyr RTOS that will present over its serial console some messages and a prompt. Any text you type and press enter will be printed back into the console. A simple “echo” app that is able to show how to setup, build, upload, debug and interact with the application running at the simulated board.
First, open VSCode. If the PlatformIO home doesn’t show, you can either click the tiny house icon at the bottom bar or the Alien icon on the left bar and then at the quick-access menu click “Open”.
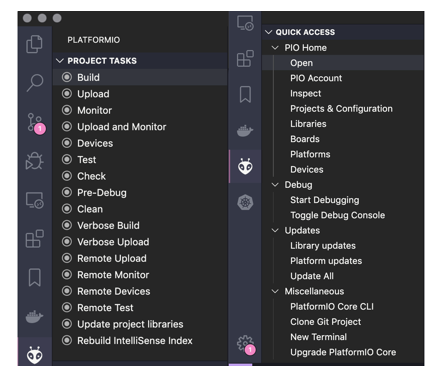
The “Quick-access” and “Project Tasks” menus have all the tools you need to interact with your project. There are some shortcuts also that will be placed on the bottom bar.
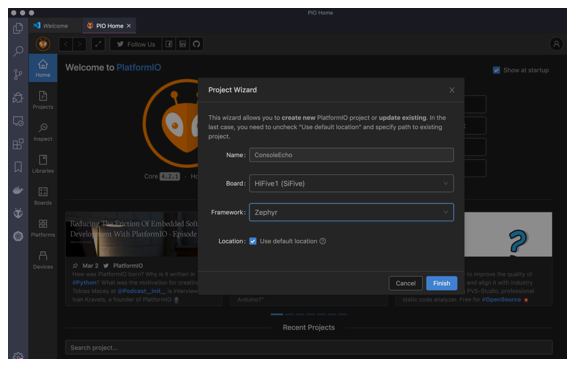
At the PlatformIO Home, click “New Project”and name it “ConsoleEcho”. Then at the Board choose “HiFive1 (SiFive)” and in the “Framework” choose “Zephyr”. This defines the hardware you have and the toolchain that will be used.
Now, PlatformIO will start downloading all requirements to develop and build applications targeting this platform. A few minutes later depending on your internet connection you have a blank project with all basic structure of folders and files created. If you ever developed for embedded systems you know this is way better than starting from scratch.
This process happens for any kind of platform you plan to develop as target. PlatformIO will download and keep all toolchains and tools organized based on your requirements and use them according to the project.
Adding code to the project
Since we created a blank Zephyr project, we will add the source code to our application:
First rename the src/empty.c file by right-clicking it at the left tree and naming it main.c.
Now open the file and add the following content:
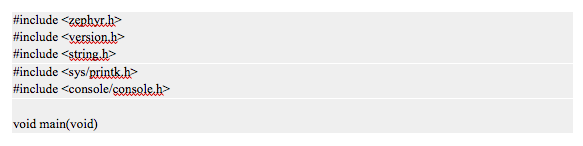
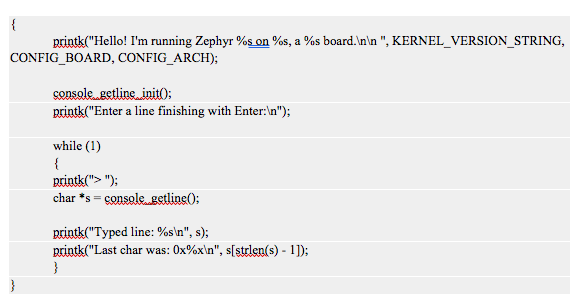
https://gist.github.com/carlosedp/bdc0c4e41a49c68a64ab8aab11521ad9
Next right-click the “zephyr” folder on the tree and click “New File”. Name it “prj.conf”. This is the file that holds Zephyr additional Kernel parameters. We will enable the console support by adding the two lines below:

Now we need to customize the project file platformio.ini adding the integration to Renode, the simulation platform. To do this, open the file and add the following:
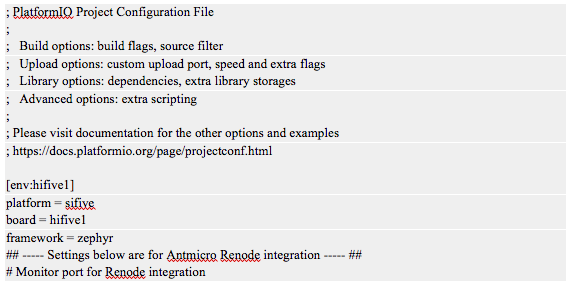
https://gist.github.com/carlosedp/9fb584ff08ca17247c8d9aec2e87edcc
You see that the part below the comment line is for Renode Integration. If you plan to deploy this application in a real HiFive1 board in the future, remove or comment the added lines to restore defaults that work with the hardware boards.
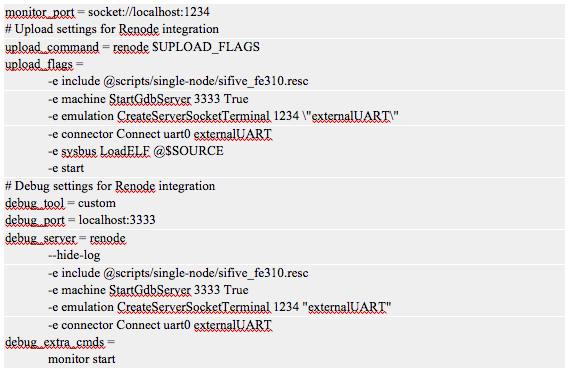
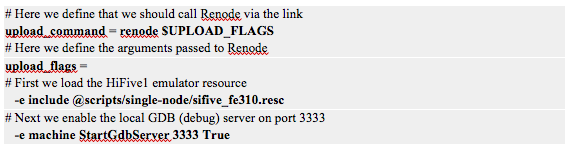
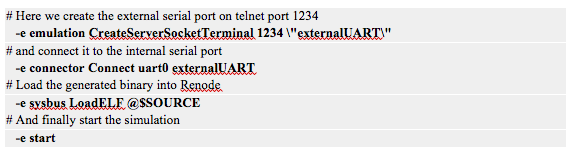
What the added lines do is overriding the default upload (sending to the board), debug and monitor commands to connect to Renode instead of the real board. We also set the monitor port access as a network connection via telnet to localhost port 1234.
In Renode we have the option of exposing it’s features over a local network connection. Looking deeper line by line, here is what we are doing:
The debug section is very similar to the upload except that we don’t need to load the binary (it’s done over the GDB protocol) and the start command is issued after the binary is loaded. We also disable Renode logs.
Save all files and we are good to go.
Building your project
Now, you can build your project by using either the Project Tasks “Build” option or clicking the tiny “checkmark” icon at the bottom bar.
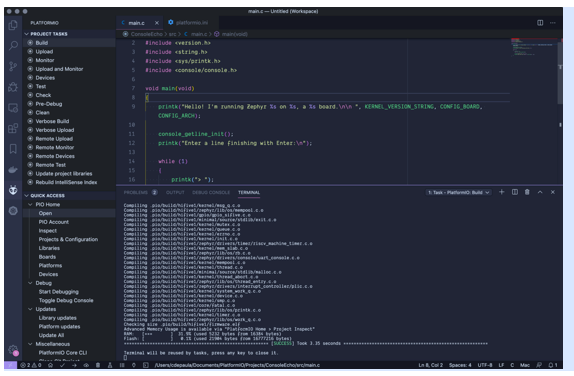
If everything goes well, you will have a new pane open on VSCode showing the terminal with all build output. You can investigate warnings or any error that might happen here.
Running your application on Renode
Now we will run the application on Renode. You can select the “Upload” option on Project Tasks or click the tiny “Right-arrow” at the bottom bar.
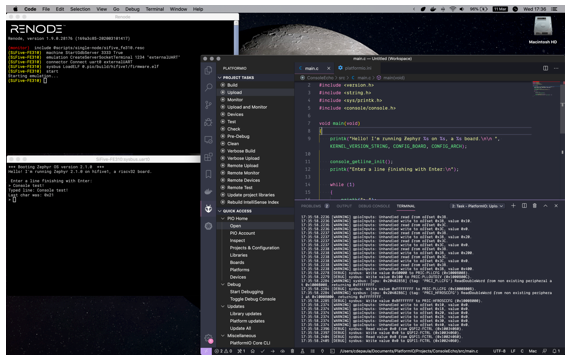
After building the app, PlatformIO opens Renode, issuing the commands we defined previously. Renode opens two windows, one named “Monitor” that is the main console where you can interact with Renode.
The second window is our simulated board serial console. Renode capture here all input and output as if you had a serial connection to your board. Now type something into the console to see it echoed back. Success!
We can also use PlatformIO integrated console by clicking the “Monitor” option on Project Tasks or the small plug icon in the bottom bar. It will open the serial console (connected over telnet to Renode):

You might need to click this pane and hit enter a couple times to have the terminal to connect. I’m investigating this and the weird characters issue.
To choose between the terminals that have the build output and the serial console, use the pull-down box in the top-right of this pane.
To close the terminal and/or the Renode session, click the little Trash Can icon at the top-right of this Terminal pane for each Task. You can also type “q” in Renode Monitor window.
If you change Zephyr Kernel parameters on prj.conf click the “Clean” option at the Project Tasks to rebuild all with correct features.
Debugging your project
Debugging your application follows a similar approach to Upload.
Here I’ve set two breakpoints, at the printk statements by hovering the line and clicking the red dot at the left of the line number. Then click the “Debug” button on the left sidebar and then the small “Play” icon at the top.
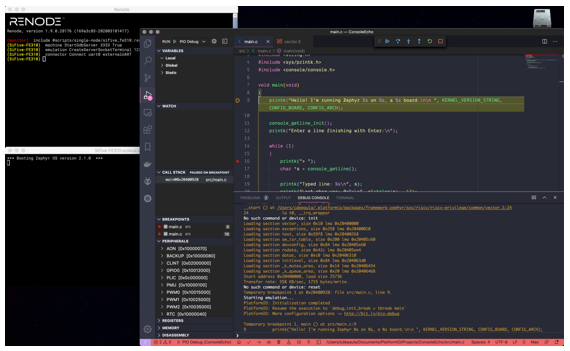
And there you go, the debug stopped at my first breakpoint where I can see the state of variables, registers and all environment during execution.
Navigate thru the debugging session using the tools for “Continue”, “Step-over”, “Step-into”, “Step-Out” and “Stop”. Restarting is yet not working in the integration. To close the debugging session, click the “Stop” button where VSCode will disconnect and Renode will be closed.
Check more details on debugging in VSCode at https://code.visualstudio.com/docs/editor/debugging.
Conclusion
As we saw, by integrating three tools, VSCode, PlatformIO and Renode we can have a complete embedded systems environment allowing you to be productive and play with these technologies without the need to buy hardware and carry them around.
The process used here could be used for other SDKs like SiFive’s Freedom-E or even using a similar process to develop for other boards that are supported by PlatformIO and Renode like STM32 using Arduino framework.
Also if you want to contribute, all these tools are open-source projects that you can bring support for your favorite board or improve some platform.
Zephyr RTOS: https://github.com/zephyrproject-rtos/zephyr/
Antmicro Renode: https://github.com/renode/renode/
Visual Studio Code: https://github.com/microsoft/vscode
PlatformIO: https://github.com/platformio/platformio-core/
Follow me on Twitter, Github or Linkedin and send me your feedback about the article and improvements to the workflow.