Written by Lucian Copeland
This originally ran on Adafruit’s website. For more content from this Zephyr Project member, visit their blog.
Of course, running someone else’s code is only useful as a test. The real first step toward creating your own Blinky system is to make your own application directory, separate from the Zephyr source code, and build it. Unlike some other RTOS systems, you don’t need to copy all the Zephyr source code into every project you start – west will automatically link to your existing zephyrproject directory whenever you build.
To get started, create a new directory in your location of choice called my_blinky. This can be anywhere, but it’s important that the system path to it contains no spaces. If you’ve created a folder named firmware projects, for instance, you’ll need to change it to firmware_projects or nothing will build.
A Zephyr application directory has the following components:
- CMakeLists.txt: your build settings configuration file – this tells
west(really a cmake build system under the hood) where to find what it needs to create your firmware. For more advanced projects, it’s also used for debug settings, emulation, and other features. - prj.conf: the Kernel configuration file. For most projects, it tells Zephyr whether to include specific features for use in your application code – if you use GPIO, PWM, or a serial monitor, you’ll need to enable them in this file first.
- src/main.c: your custom application code – where the magic happens! It’s advisable to put all of your custom source code in a
src/directory like this so it doesn’t get mixed up with your configuration files. - Optional boards/ or soc/ overlay directories: in some cases, the board or even the specific MCU chip you want to use might not be supported yet in Zephyr. If this is the case, you can create your own definitions in your custom projects. It’s out of the scope of this starting tutorial, but it’s a good option to know about.
The Feather STM32F405 Express is built into Zephyr as a supported board. This means that you don’t need to code any configuration files or adjust any settings – it’s all included already!
You don’t need to create the rest of the files from scratch either. Instead, navigate to your zephyrproject/zephyr/samples/basic/blinky and copy CMakeLists.txt, prj.conf, and src/main.c to my_blinky/. Open CMakeLists.txt in your favorite text editor and you’ll see the following:
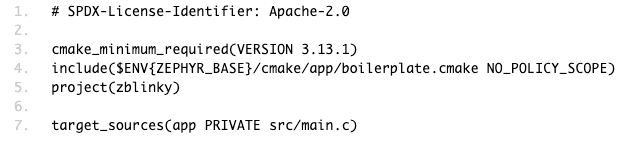
All you have to do is change the project(projectname) to my_blinky, and your files are ready to compile!
If you opened a new terminal window to do this, note that you’ll need to run the following again:

This will make sure west is available, and is aware of the environmental variable $ZEPHYR_BASE in the CMakeLists.txt file above. $ZEPHYR_BASE stores the location of the source code in zephyrproject/ – you can view it by typing echo $ZEPHYR_BASE in the terminal if you’d like to double check.
Now that we’re set up, building and flashing is very similar to what you did with the sample blinky project:
DFU Bootloader
Plug in the STM32 Feather, making sure the Boot0 pin (B0) is connected to 3.3V, and hit the reset button. Then run:

Jlink
Ensure the board is powered and plugged into the Jlink, then run:

Creating custom code
So far, this hasn’t been much different than what you did for the sample blinky project. However, now that you’re in our own directory, you can go in and make changes. You can start with a simple change to alter the speed the LED blinks at. Open up src/main.c and you’ll see the following:
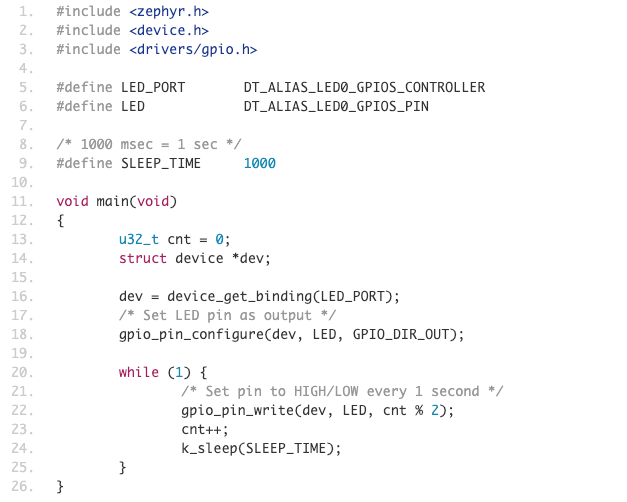
Try changing #define SLEEP_TIME 1000 to 100 instead. Then run the build and flash commands again. The LED should be blinking much faster.
Congratulations! You’ve taken your first steps into the RTOS rabbit hole. From here, you can explore the other samples, think about how an RTOS could help your own projects, and even start programming your own fully custom projects.
For more tips and links on where to go next, click here.