Written by Mahesh Venkitachalam, Founder of Electronut Labs
This blog post first ran on the Electronut Labs Website. To see more content from Mahesh Venkitachalam or to learn more about Electronut Labs, visit https://electronut.in/.

INTRODUCTION
I worked for almost two decades in the software industry. In the early 2000s, I was developing applications on Windows, Linux, and various flavours of Unix. On the Windows side, we had Microsoft Visual Studio, MFC, NMake, and CL. On the Linux/Unix side, we had GCC, POSIX and various types of windowing toolkits (X-Window + Motif, anyone?). Cross platform development was a challenge, but even before the advent of fancy tools like Qt and wxWindows, we were able to structure the code so that large parts of it was compatible across the different operating systems.
Compared to that, cross-platform development in the embedded world today is far more difficult. First of all, there are many chip architectures – AVR, ARM, Xtensa, RISC-V, etc., and these chips vary hugely in their capabilities and supported peripherals. Then there are different sorts of toolchains, libraries, and development environments. Not all them can run an OS (or an RTOS) and in many cases, people don’t prefer to. Overall, good luck trying to port your code from once device to another! Although efforts like mbed try to address the cross-platform issue, they are restricted to certain chip families.
Why not just use embedded Linux then? You certainly can in many cases, as the huge success of Raspberry Pi shows. But when it comes to resource constrained low power systems, Linux is just too heavy. Enter Zephyr – an RTOS (Real Time Operating System) that is very much influenced by Linux, but designed specifically with the above constraints in mind.
OBJECTIVE
In this project, we will build a BLE (Bluetooth Low Energy) device that broadcasts data from a BME280 temperature/humidity sensor. For this, we will use the Zephyr RTOS on the Electronut Labs hackaBLE board based on the Nordic nRF52832 SoC. For programming hackaBLE, we will use the Electronut Labs BumpySWD debugger based on the blackmagicprobe project.
GETTING STARTED
The first thing to do of course, is to install Zephyr. For this task and for all tasks ahead, the official documentation page is your best reference. You can install Zephyr on Linux, Mac, or Windows. But I did it on Linux, and hence this article will reflect that experience. As you go through the official installation procedure, I recommend that you install the Zephyr SDK as well, since it has the required toolchain. Makes it easy to get started.
Now, before we proceed to build our “hello world” application with Zephyr, let’s look at a few concepts that are central to working with this RTOS.
CMake
If you have worked with embedded systems for any considerable time, you’re probably familiar with Makefiles. Well, CMake is a system that makes Makefiles. CMake is a cross-platform tool that uses configuration files to create build files specific to your system. Zephyr uses CMake, and building a project goes something like this:
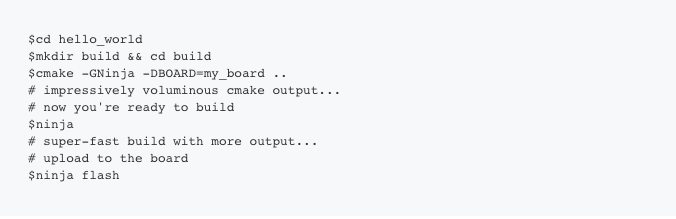
Ninja is a build system designed to use with CMake. Apparently it’s faster – as ninjas tend to be. In addition to CMake/Ninja, Zephyr is also working on a “meta-tool” called west which will replace the above eventually. But for now you can still use our masked friend.
Device Trees
Your embedded device has a complex hierarchy of components, starting from higher level elements like LEDs and Buttons, down to SoC peripherals like I2C and ADC. In Linux, and in Zephyr, this hierarchy is represented as a device tree. The device tree resides in DTS (Device Tree Source) files – these are human readable text files. In Linux, these are compiled into binary DTB (Device Tree Blob) files using a DTC (Device Tree Compiler). In Zephyr, to reduce overhead, the DTS information is just used during compile time. The DTS files are naturally hierarchical. For example the nrf52840_pca10056.dts includes nrf52840_qiaa.dtsi, which in turn includes nrf52840.dtsi – going from board to chip variant to the core SoC.
If you are not familiar with device trees, the whole thing might seem a bit odd. But consider this: how does the Linux kernel support such a huge variety of third party devices without having to recompile the code every time? Because the device information can be passed into the kernel as a binary “blob” – the DTB.
So how do you get Zephyr to talk to your particular device? Chances are that a variant of this device is already supported by the kernel. So you take the relevant DTS and either make a modified copy of it, or write an overlay for it – something that adds or modifies the existing device so it matches yours. The DTS file along with some other configuration files constitute the “board files” for your device. We’ll be creating these files for hackaBLE in this project, so things will become clearer further ahead.
Config Files
Device Trees help you describe the hardware. There is another level of application-specific customisation required, which will let you enable only those features you really need. In Zephyr, this is done via the Kconfig configuration system. The “board files” we talked about earlier contain some default configurations, which can be further refined using application specific configurations. For example, if you want to enable the Bluetooth subsystem, you would have this in your project’s prj.conf file:

Enabling only what you need is critical for embedded systems, since it has a direct impact on things like power consumption, memory, and performance.
Kconfig also provides an interactive UI for setting all the configuration options. Doing a ninja menuconfig in the builddirectory with bring up this UI:
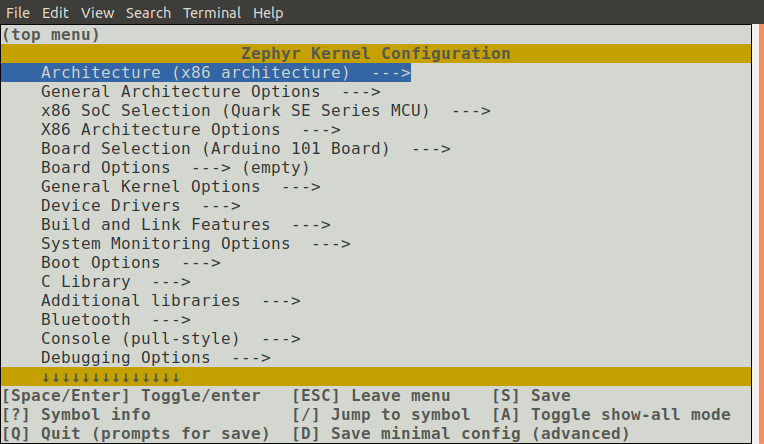
menuconfig gives you the entire configuration tree. You can search and navigate through this tree to set your relevant options. It’s a clunky interface, but it’s lightweight, and works across platforms. Once you set your options, save, and quit, you can rebuild your application with the new options. But here’s the catch – these options are saved inside your build directory, and will be blown away if you delete this directory. So to save these options for the future, you need copy these to your prj.conf file. (Here’s a menuconfig tip – while you are on a configuration option, press Shift-?, and you will get a help file that gives you the exact name of that option.)
Now let’s put this above knowledge to some use by building a couple of Zephyr applications on hackaBLE.
REQUIRED HARDWARE
You need the following hardware to build this project.
- Electronut Labs hackaBLE
- Electronut Labs Bumpy SWD programmer
- BME280 breakout board
- Breadboard, connecting wires
HELLO WORLD ON HACKABLE
The hackaBLE board is not directly supported by Zephyr, so the first thing we want to do is create the required board files. hackaBLE uses the Nordic nRF52832 SoC, so we’ll just modify the board files for the Nordic nRF52832-DK board which is already supported by Zephyr, and listed under nrf52_pca10040.
Adding hackaBLE to Zephyr
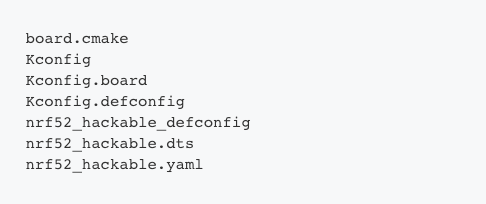
First, we need to copy boards/arm/nrf52_pca10040/ to a new directory boards/arm/nrf52_hackable/. Then we rename the files as follows:
The next step is to replace the occurrences of pca10040 inside the above files with hackable. The next important edit is for board.cmake which will contain just:include(${ZEPHYR_BASE}/boards/common/blackmagicprobe.board.cmake)
This is required for us to program hackaBLE using the Bumpy SWD debugger, which is based on blackmagicprobe. Next, we’ll edit the DTS file to map the correct pins to the peripherals we will be using.
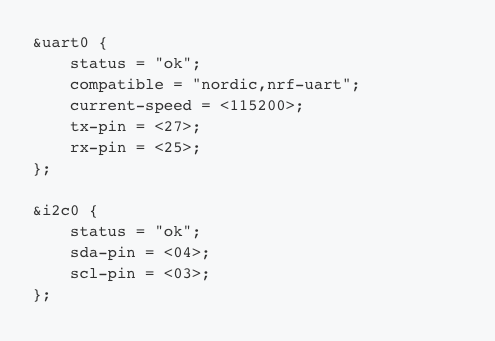
We need to use I2C and UART in this project, so we’ve correspondingly mapped the nRF52832 SoC peripherals to convenient pin numbers on hackaBLE.
Code Setup
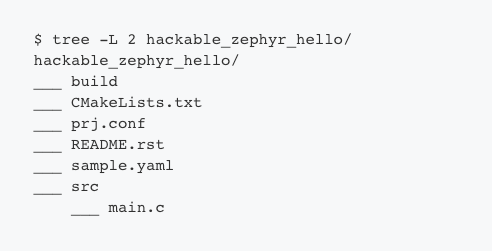
The Zephyr build system allows you to easily build your project outside the installation folder. It’s usually easiest to just copy a sample project over and then modify the configuration. In our case, the folder looks like this:
Here’s what our prj.conf looks like:

Remember our discussion on Kconfig? The above file tells CMake that we want to enable GPIOs and the UART console.
Our main.c is very simple:

Let’s go through the above code quickly. The first thing it does is to get the GPIO_0 device binding – again, this come from the DTS file, and nRF52832 has only one GPIO port – P0. We then configure P0.17 – the LED red channel – as an output. In the main loop, all we do is flash the LED and print “hello world”, with delays in between. The printk outputs to the serial port, as per our config file which has enabled UART console – CONFIG_UART_CONSOLE=y.
Now we go into the build directory and build our project as follows:

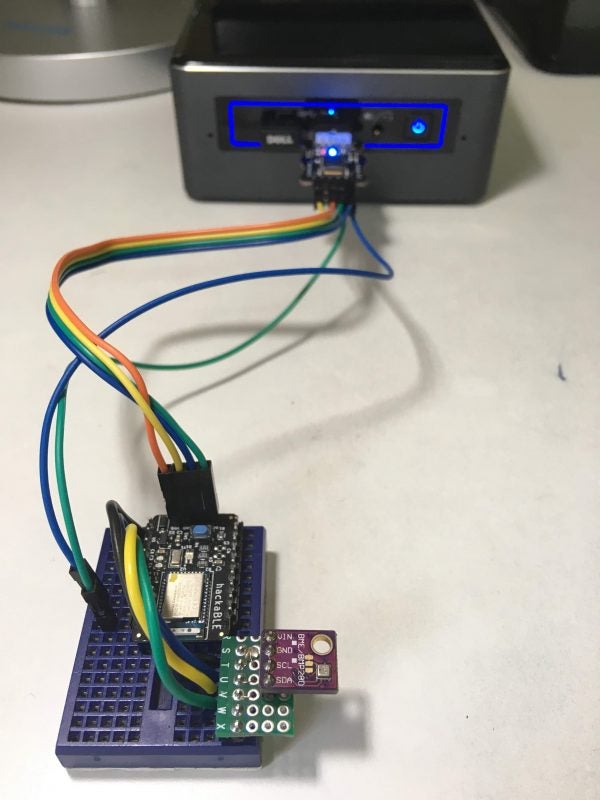
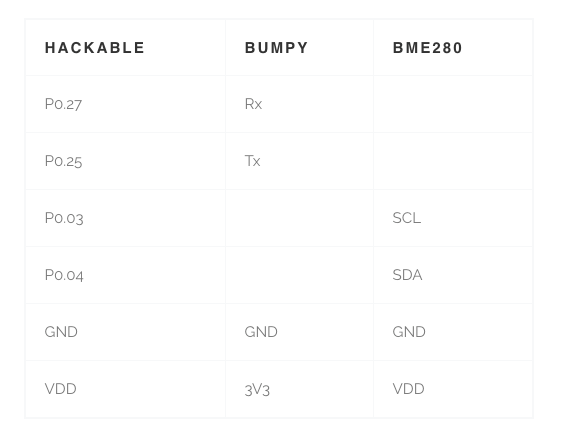
Before we upload the code, let’s take a look at the hardware hookup.
Hardware Connections
For this project, hook up the hardware as follows so it matches up with our DTS and config files.
Upload and Test
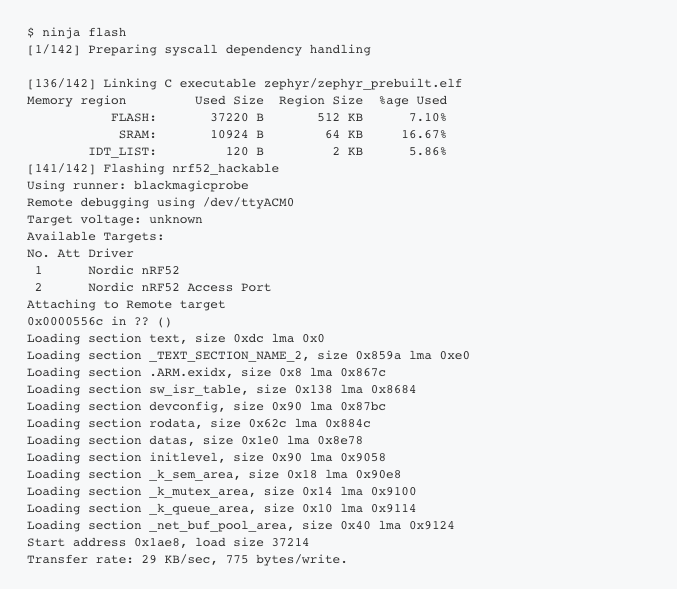
The last step is to flash the code:
To test the output, we open a serial terminal using picocom:

In the attached screenshot below, you can see the output:

From the above, you also get an idea of my workflow. I use the byobu terminal multiplexer, and the four screens from top left, going anti-clockwise are – zephyr build, USB monitoring using dmesg -w, picocom output, and a Python shell for calculations.
Now that we’ve got “hello” going. let’s try something more interesting.
BUILDING A BLE TEMPERATURE/HUMIDITY MONITOR
In this project, we’re going to enable the Zephyr BLE stack, communicate with the BME280 sensor using I2C, and then send the temperature and humidity data in two ways – via BLE advertisement packets, as well as via GATT characteristics – once a connection is made by a BLE central device like a mobile phone.
Configuring BLE and BME280
To enable BLE, you need the following in your prj.conf:

Oh, I didn’t come up with all the above stuff by myself. Zephyr has fine BLE examples that I pilfered from. The above enables BLE and sets up various parameters – for example, CONFIG_BT_PERIPHERAL=y says that our device is a peripheral, not a central, and CONFIG_BT_DEVICE_NAME=”hackaBLE” sets the name we advertise by.
Next we need to configure the BME280 sensor, which, luckily is already supported by Zephyr:
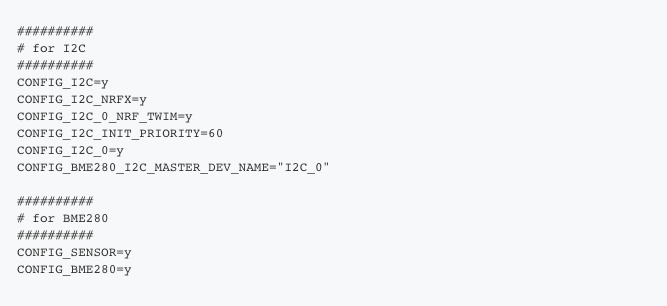
Above, we first configure I2C, and there are some special settings for NRF which you can see above. Once I2C is enabled, we then enable the sensor subsystem on Zephyr, and more specifically, the BME280 sensor.
The Code
I won’t go through the whole code here, but here are the highlights.
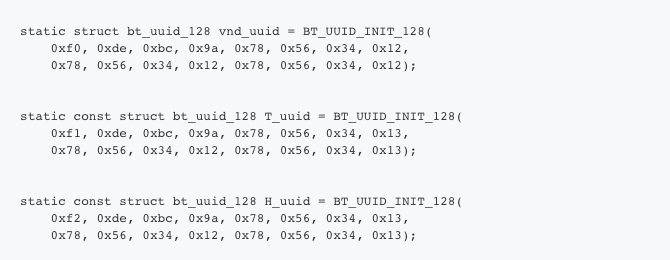
We start by defining the main BLE service and the two characteristics we will be using – Temperature and Humidity:
These are added to the BLE subsystem as follows:

In the code above, you can see read/write functions assigned to each characteristic, as well as permissions, and the Client Characteristic Configuration Descriptor (CCCD) which lets the client (the central) enable notifications.
Here’s how we set up the BLE advertisement packet.
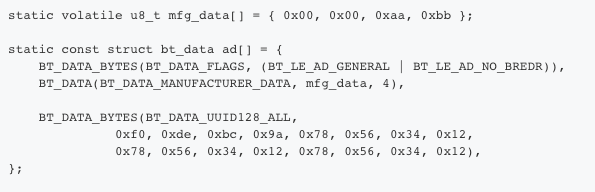
Above, we’ll use the third and fourth bytes in mfg_data to send the most significant digits of temperature and humidity respectively.
We access the sensor in a manner similar to what we did with GPIO before:

Here’s how you get the BME280 data:
In Zephyr, sensor data is stored in a struct as follows:
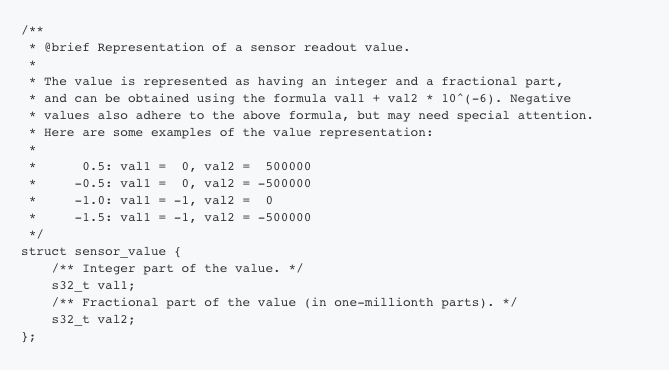
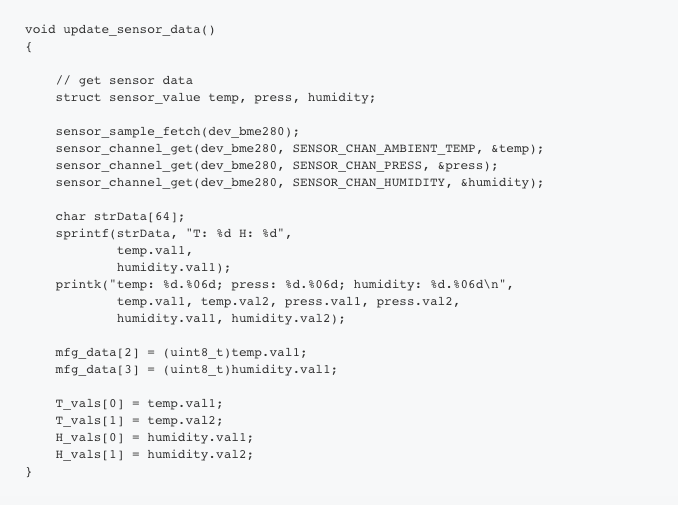
So in our code, we retrieve the temperature and humidity, and store them both for advertisement packets and for the characteristics.
Here’s our main loop:
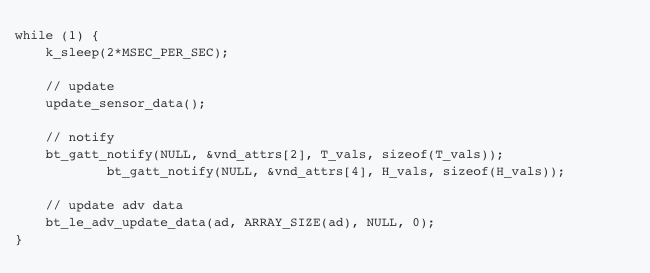
What we’re doing above is notifying the connected device with the new sensor values as well as updating the advertising data.
Build and Test
You can build and flash the code similar to the hello example. To test the device, we will be using the Nordic nRFConnect mobile app. Here’s what you see when you scan:
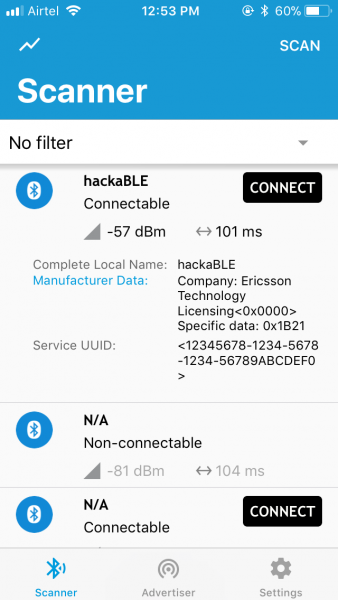
In the above screenshot, you can see that the last two bytes of the advertisement packet manufacturer data is 0x1b21 – 27 degree C with a humidity of 33%.
Now, let’s connect to it.
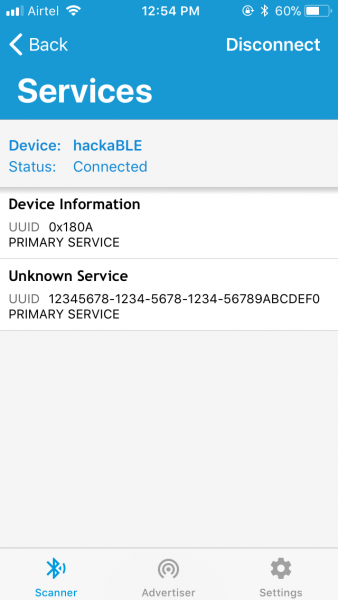
You can see the UUID of the primary service we defined. If you click on it, you will see the characteristics:
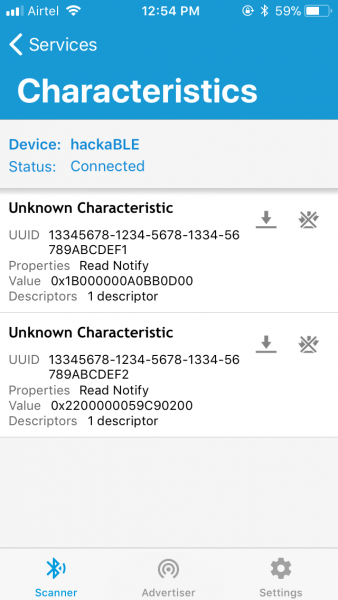
Taking some help from Python, we get:

Hence, T = 27.900000 deg C, H = 34.182617 %. If you enable notifications, you will see that these values update on the phone every two seconds, as per our code.
So here we are – a BLE device based on Nordic nRF52832 that transmits weather data, powered by the Zephyr RTOS!
Programming hackaBLE without Bumpy
It’s perfectly possible to program hackaBLE without Bumpy. If you want to use the Nordic nRF52832-DK (PCA10040) for that purpose, you need to use the same board.cmake as the PCA10040 in the board files. You’ll also need to match the Rx/Tx lines of hackaBLE and the DK in the DTS file to get the serial output.
CONCLUSION
I learned a lot of programming on Linux. I always liked the “everything is a file” idea and standard programming concepts that worked across systems. Thinking in terms of processes, threads, inter-process communication mechanisms, sockets, etc. was natural, and these were concepts and programming conventions that were portable. But working with embedded systems today, vendor lock-in is a worrying trend, whether it be proprietary hardware programmers, expensive development tools, non portable APIs, or closed protocol stacks. There is a dire need for open, vendor-neutral frameworks like Zephyr, and the fact it follows the Linux model is a big plus in my view. We are definitely looking at Zephyr as the primary platform for our upcoming projects and products.
DOWNLOADS
You can download the source code for this article at the link below: https://gitlab.com/electronutlabs-public/blog/hackable_zephyr
ACKNOWLEDGEMENTS
I thank Tavish Naruka for introducing me to Zephyr, as well as troubleshooting issues on various occasions.