Configure an Application’s Kernel
The application’s kernel is configured using a set of configuration options that can be customized for application-specific purposes. The Zephyr build system takes a configuration option’s value from the first source in which it is specified. The available sources are (in order):
- The application’s current configuration.
(i.e. The
.configfile.) - The application’s default configuration.
(i.e. The
.conffile.) - The board configuration used by the application.
(i.e. The board’s
.defconfigfile.) - The kernel’s default configuration.
(i.e. One of the kernel’s
Kconfigfiles.)
For information on available kernel configuration options, including inter-dependencies between options, see the Configuration Options Reference Guide. Be careful to note if an option is an experimental option that is not yet fully supported.
Procedures
Defining the Application’s Default Kernel Configuration
An application’s .conf file defines its default kernel configuration.
The settings in this file override or augment the board configuration settings.
The board configuration settings can be viewed
in $ZEPHYR_BASE/boards/ARCHITECTURE/BOARD/BOARD_defconfig.
Note
When the default board configuration settings are sufficient for your
application, a .conf file is not needed. Skip ahead to
Overriding the Application’s Default Kernel Configuration.
Before you begin
- Ensure you have created an application directory, as described in Create an Application Directory.
- Review the kernel configuration options available and know which ones you want to set for your application. Be aware of any dependencies involving these options. See the Configuration Options Reference Guide for a brief description of each option.
Steps
Navigate to the
appDir, and create theprj.conffile. Enter:$ touch prj.conf
The default name isprj.conf. The filename must match theCONF_FILEentry in the applicationMakefile.
Edit the file and add the appropriate configuration entries.
- Add each configuration entry on a new line.
- Begin each entry with
CONFIG_. - Ensure that each entry contains no spaces (including on either side of the = sign).
- Use a # followed by a space to comment a line.
The example below shows a comment line and a board configuration override in the
prj.conf.# Change the number of IRQs supported by the application CONFIG_NUM_IRQS=43
Save and close the file.
Overriding the Application’s Default Kernel Configuration
Override the application’s default kernel configuration to temporarily alter the application’s configuration, perhaps to test the effect of a change.
Note
If you want to permanently alter the configuration you
should revise the .conf file.
Configure the kernel options using a menu-driven interface. While you can add entries manually, using the configuration menu is a preferred method.
Before you begin
- Ensure you have created an application directory, as described in Create an Application Directory.
- Review the kernel configuration options available and know which ones you want to set for your application. Be aware of any dependencies involving these options.
- Ensure the Zephyr environment variables are set for each console terminal; see Common Procedures.
Steps
- Run the make menuconfig rule to launch the menu-driven interface.
- In a terminal session, navigate to the application directory (
~/appDir).- Enter the following command:
$ make [BOARD=<type>] menuconfigA question-based menu opens that allows you to set individual configuration options.
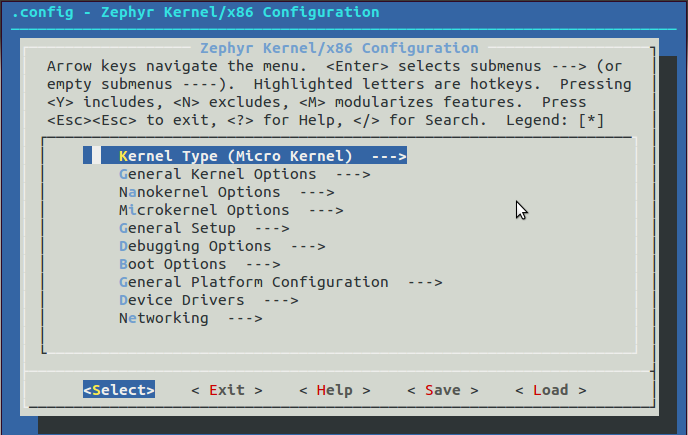
- Set kernel configuration values using the following key commands:
- Use the arrow keys to navigate within any menu or list.
- Press
Enterto select a menu item.- Type an upper case
YorNin the square brackets [ ] to enable or disable a kernel configuration option.- Type a numerical value in the round brackets ( ).
- Press
Tabto navigate the command menu at the bottom of the display.Note
When a non-default entry is selected for options that are nonnumerical, an asterisk
*appears between the square brackets in the display. There is nothing added added the display when you select the option’s default.
For information about any option, select the option and tab to < Help > and press
Enter.Press
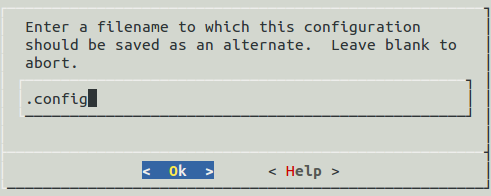
Enterto return to the menu.After configuring the kernel options for your application, tab to < Save > and press
Enter.The following dialog opens with the < Ok > command selected:

Press
Enterto save the kernel configuration options to the default file name; alternatively, type a file name and pressEnter.Typically, you will save to the default file name unless you are experimenting with various configuration scenarios.
An
outdirdirectory is created in the application directory. The outdir directory contains symbolic links to files under$ZEPHYR_BASE.
Note
At present, only a
.configfile can be built. If you have saved files with different file names and want to build with one of these, change the file name to.config. To keep your original.config, rename it to something other than.config.Kernel configuration files, such as the
.configfile, are saved as hidden files inoutdir. To list all your kernel configuration files, enter ls -a at the terminal prompt.The following dialog opens, displaying the file name the configuration was saved to.
Press
Enterto return to the options menu.To load any saved kernel configuration file, tab to < Load > and press
Enter.The following dialog opens with the < Ok > command selected:
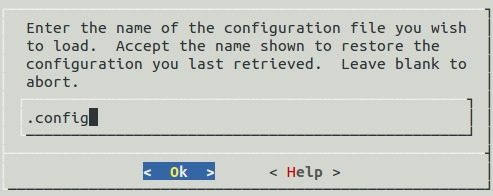
To load the last saved kernel configuration file, press < Ok >, or to load another saved configuration file, type the file name, then select < Ok >.
Press
Enterto load the file and return to the main menu.To exit the menu configuration, tab to < Exit > and press
Enter.The following confirmation dialog opens with the < Yes > command selected.

- Press
Enterto retire the menu display and return to the console command line.